 |
| At a Cache Site |
My youngest son, Ben, and I have become intermittent geo-cachers. It's a great way for he and I to spend some time together, get some exercise, and be outdoors. In addition, both of us are kind'a technology nerds (you may have noticed that about me). Lets just say, the apple didn't fall far from the tree! Geo-caching allows us to merge our love of the outdoors, hiking, and technology.
The good folks at
Geocaching.com state that "Geocaching is a free real-world outdoor treasure hunt. Players try to locate hidden containers, called geocaches, using a smartphone or GPS and can then share their experiences online." More specifically, people go into the woods, suburbs, and cities and hide water-proof containers (ammo boxes, all the way down to little match boxes) with a notebook to sign when and who found it, and sometimes prizes. The cache location is then uploaded to Geocaching.com with the exact coordinates, and other pertinent details. Than people like Ben and I can access those same coordinates at a later date from the website or specific apps and find those hidden sites. So it's a treasure hunt of sorts with a bit of technology thrown in!
 |
| Geocaching App |
We use the Geocaching app on my iPhone which is available for $9.99. This may seem like kind of a step price until you get a sense of all the app offers. According to the developers, this app accesses "exclusive coordinates and detailed information for nearly 2 million hidden geocache containers across the globe".
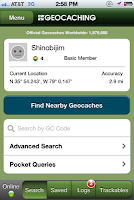 |
| Home Screen |
Once you create an account and log into your Geocaching app, the page to the right is what you will be presented with. Note my name, and below that my current coordinates. Finding a nearby cache is as simple as pressing the blue rectangle button in the center "Find Nearby Geocaches".
.PNG) |
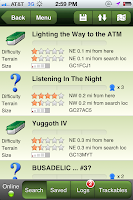
| Nearby Caches |
The page to the left shows me nearby caches. The top of each listing gives me the name. Below that is a starred likert scale for both the difficulty and the terrain. In addition there is another likert scale for the size of the cache. Finally there is the general direction the cache is from where the user is standing, as well as the distance.
.PNG)
In this instance, we clicked onto "Lighting the Way to the ATM", the top cache on the above image. The image on the right shows the map. The blue dot, flashes, and it represents the person. The green symbol is the cache. This particular cache was in a small business district, and we found the cache while enjoying 5-Guys Burgers. So, there really was no significant planning.
.PNG) |
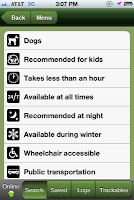
| Attributes |
One resource you can look at in the app on the called "Attributes". This is a really useful bit of info, telling you what you might consider in going on this hunt. For example, to the left, you can bring your dogs, it is recommended for kids, should take less than an hour, it's available at all times, etc... Even telling you if it's wheelchair accessible, or near public transportation. Thinking therapy applications now! Let's learn to use the bus system AND go on a treasure hunt!
.PNG) |
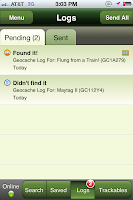
| Logs |
One other function is the ability to keep logs of your hunt. You can post whether or not you found the cache, take pictures, and send it all to the Geocaching website if you choose. Ben and I have a few caches that we did not find, but we intend to go back!
Once you've purchased the app, using the service is free of charge. This fact, blows me away! So, now you too can geocache, get outdoors, in the wilderness or your town and search for treasures. Eventually, Ben and I plan to hide a few of our own geocaches.
Happy Hunting!
 If the iDevice is for a specific function such as tracking homework, following a schedule, or a aug comm device, this is easily fixable. The iDevices have a built in "Restrictions" utility that lets you remove different functions. Let's get rid of some the unnecessary and distracting apps.


.PNG)
.PNG)
.PNG)
.PNG)


.PNG)


